How Does My Garden Grow? - Part 1
Composting Raised Beds
I've never had a garden. I've had flower beds, and I've planted a few tomato, pepper, and zucchini plants before. But I've never had a full-fledged garden. So I decided I would like to develop a Kitchen Garden where I could grow some herbs and vegetables. This is all new to me, so I have a lot to learn. It's a good thing I have a friend who is a Master Gardener and knows this stuff!
Chris says these raised bed compost sandwiches have excellent water holding capabilities, fewer weeds, and a crumbly, nutritional soil. They are made by layering an assortment of materials, such as:
- Cardboard
- Newspaper
- Carbon materials (browns) such as leaves, straw, weedless grass hay, newspaper, shredded bark
- Nitrogen materials (greens) such as grass clippings, vegetable peelings, seedless weeds, perennial plant clippings, coffee, tea bags
- Topsoil
- Manure from herbivores (chickens, rabbits, horses) but not carnivores (dogs, cats)
- Water
You can read Chris' wealth of knowledge about composting on her website, A Suburban Farmer or in her book, The Complete Idiot's Guide to Composting. So, with all this new information in my head, I got started planning and developing my Kitchen Garden.
I began by saving cardboard boxes and newspapers.
And accumulating fallen leaves, grass clippings, discarded pumpkins, straw and manure from the hen house.
I selected the location for my garden . . . a spot that is close to the kitchen and gets full sun for six to eight hours of the day.
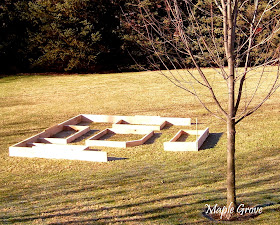
Once we figured out what size we wanted our garden to be, we drew it on paper and figured out how much wood we would need. Cedar and redwood are excellent choices to use for garden beds since they will take longer to decompose than softwoods such as pine. Lumber that has been pressure treated for outdoor use is not a good selection as the chemicals used to treat the wood will seep into the soil. We were able to buy rough hewn red oak from an Amish-owned wood mill. They cut the boards to the size we needed.
We constructed the raised bed, using 2x10 inch boards for the perimeter and 2x8 inch boards for the actual beds.I began by saving cardboard boxes and newspapers.
And accumulating fallen leaves, grass clippings, discarded pumpkins, straw and manure from the hen house.
I selected the location for my garden . . . a spot that is close to the kitchen and gets full sun for six to eight hours of the day.
Once we figured out what size we wanted our garden to be, we drew it on paper and figured out how much wood we would need. Cedar and redwood are excellent choices to use for garden beds since they will take longer to decompose than softwoods such as pine. Lumber that has been pressure treated for outdoor use is not a good selection as the chemicals used to treat the wood will seep into the soil. We were able to buy rough hewn red oak from an Amish-owned wood mill. They cut the boards to the size we needed.
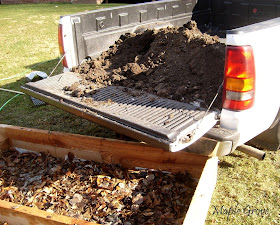
We layered the materials we collected in the beds, watering the layers with a garden hose. First we laid down the cardboard, then the newspaper, leaves, straw, manure and wood ash, repeating the layers.
The Chickie-Babes think this is a lot of fun. Their scratching in the beds actually helps to aerate and break down the materials.
If the weather had been exceedingly dry, we would have needed to occasionally add some light watering to the beds. We had enough snow fall, however, that we didn't need to water. And so the beds sat at rest all winter, decomposing and developing a rich soil for spring planting.
Be sure to follow along to see how my garden grows. You can subscribe by e-mail to receive new posts, plus when you subscribe, as a thank-you I'll send you a free digital copy of "Farm to Table Through the Year" a collaborative work for which I am a contributing writer. Just enter your email address in the box at the top right column of this page. Thanks for following!


