 This is a quick tutorial about how I made a simulated leaded glass design on my windows. The products I used are made by Gallery Glass by Plaid: Instant Lead Lines, Crystal Clear Window Color, and Simulated Liquid Leading. The Instant Lead Lines are adhesive rubber strips. It only cost $26 to decorate two windows.
At Maple Grove we're pursuing a simpler life to the glory of God!
Showing posts with label DIY. Show all posts
Showing posts with label DIY. Show all posts
How to Make Simulated Leaded Glass Window Designs
This is a quick tutorial about how I made a simulated leaded glass design on my windows. The products I used are made by Gallery Glass by Plaid: Instant Lead Lines, Crystal Clear Window Color, and Simulated Liquid Leading. The Instant Lead Lines are adhesive rubber strips. It only cost $26 to decorate two windows.
Wren House Pattern and Instructions

They usually arrive in our area around the beginning of May, but this winter was so mild that they arrived by mid-March.
It's always fun to watch them filling their houses with grasses and twigs as they build their nests. Then it is so exciting when we hear their young nestlings start to chirp. Both parents get involved in the nesting and the feeding of their young. Before long, we enjoy seeing the nestlings start to poke their heads out of the house and finally fly out as young fledglings. Following are the instructions and pattern pieces to build your own wren houses.
Shiplap, oh yes, Shiplap!
 We remodeled our kitchen several years ago, installing a farm sink and stone counter top, but I just couldn't decide what to do about a back splash on the wall. I thought seriously for a while about subway tile, which I love, but we really didn't want to apply adhesive and grout to the plaster walls that could cause damage or be hard to remove in the future. We wanted to do something less damaging, but what?
Hanging Mason Jar Candleholders and Dangling Bead Strands

Rustic Winter Mantel Display

A home can look so bare and empty after the Christmas decorations are taken down and packed away. Usually I automatically leap to the typical, expected Valentine's decorations.This year I felt like I needed a change, but what? Rather than go out and buy new decorations, I decided to rummage around the house and see what I have that I could use to decorate the fireplace mantel for the remainder of the winter.
How to make a picket fence American wall flag

A large wooden flag wall hanging like this would cost in the neighborhood of $100 at a store, but we made ours for practically nothing with materials we had laying around the house and yard. We built ours from old wooden fence pickets, but you could use any old (or even new) wood that you have. We actually keep a stack of wood boards outside to weather for use in decorative projects. Here's how we built our wall flag:
Chicken Feeder Candy Dish

What a cute and inexpensive candy dish in time for spring and Easter! Buy and wash a galvanized chick feeder from your local Tractor Supply or farm feed store. Fill a mason jar with candy and attach it to the feeder. What could be more simple?
How to Build a Support Structure for a Farm House Sink

In planning for the renovation of our kitchen, we knew that we wanted a country style. One of the icons of a country kitchen is the farm sink. These sinks and the necessary hard surface counter to go with them can be costly, so we tried to reduce costs in every other way we could by doing the work ourselves, waiting for a sale on cabinets, and buying lower-end appliances. The sink and counter top were our splurge. There are many different types of farm house sinks, made of a variety of materials. We chose a single basin apron front sink made of fireclay.
Shout it out: PUMPKINS!

I'm not sure why. Maybe it's all the variations in colors, shapes, sizes, and textures. Maybe it's because they represent the change of seasons to fall. I even just like to say the word "Pumpkins!" Put it all together, it just makes me feel giddy. I wanted a Pumpkins sign that would shout it out. I looked for a few years but couldn't find just the right one. (At least not at a price I was willing to pay.) So I just made it myself.
Here's how easy it was:
Building a Stone Cairn
When we moved six years ago, we faced a lot of clean-up on our property. As we had to do some excavating, we found a lot of stones and stacked them in piles according to size. We were sure we would find some creative use for them in time.


The first thing I wanted to do with some of the stones was to build a cairn. Cairns are man-made heaps of stones that have been erected all over the world since ancient times. Varying in size and complexity, they serve as land markers. Some were built to mark graves, summit tops, or trail ways. Others marked the location of historical or memorable events. A carefully built cairn will stand perfectly balanced without the use of cements or adhesives.

I chose a very large, flat stone (rock) to serve as the base for our cairn. Then I chose varying sizes and carefully balanced them on top of each other, interspersing a larger one in between a stack of smaller ones. As I neared the tops, I used increasingly smaller stones.
The trick is to keep it level and balanced. You should wear heavy shoes when you're building a cairn (definitely not flip-flops!) and be aware of where your feet are. It if topples over while you're working on it (which it most likely will, a couple of times), it could really hurt if those stones land on your feet.
This cairn has been standing in perfect balance for six years. I built it to serve as a monument to the greatness and goodness of our God, a memorial for us to recount the ways He has blessed us and to testify to His mercy and faithfulness.
"When your children ask their fathers in times to come,
'What do these stones mean?' then you shall let your children know. . .
that the hand of the LORD is mighty, that you may fear the LORD your God forever"
(Joshua 4:21-24).

Visit Maple Grove on Facebook
Antique Dresser turned Vanity
When my husband was a child, he kept his clothes in an old dresser that belonged to his great-aunt. It had taken a beating, so when we got married and had children of our own, I stripped and re-stained it for my daughter to use in her bedroom. It took another beating. Years went by, and my daughter was married, but I hung onto the antique dresser. I wasn't sure how or where I would use it, but I love antiques, and I really love turning trash into treasure.
Our bathroom was from the '70's era and since I wanted to renovate it to suit my country decorating style, I got the idea to convert the dresser into a vanity. I wasn't sure how my husband would feel about cutting a hole in the top of his great-aunt's old dresser, but it turned out that he loved the idea! Our thinking was that we could stick the dresser in the basement and use it for storage, or we could put it to use in the bathroom where we could appreciate it every day. So the renovations began.
This is a photo of the old vanity that we removed. Notice that the sink is a 70's blue, but the toilet had been replaced and was more like a 90's periwinkle. It looked purple next to the sink.

When we pulled the old vanity out, we discovered that there was no tile on the floor or the wall where the vanity had been placed. We went to a demolition salvage place, but we couldn't match the tiles. I really liked the ones we had and didn't want to replace them. There's always a solution! We stained a piece of oak veneer to match the dresser and installed it on the floor, and we found some plain ivory wall tiles that matched in color (but not in texture) to the old ones. They are mostly hidden by the new vanity, so we are the only ones who would ever notice the difference.

On to the dresser! I stripped and re-strained again, a repeat from 25 years earlier. My husband cut a hole in the top using the template that came with the bathroom sink we had purchased. Ooh, was that scary!

Any time I have seen a dresser converted to a sink vanity, the top drawers are usually eliminated, and the drawer fronts are permanently attached as false drawers. My husband had a very clever idea. He removed the sides of the drawers toward the center and cut the bottoms of the drawer to fit around the oval shape of the sink bowl. He replaced the inner sides with strips of luan that he scored at 1/4" intervals using a table saw so that he could bend it to shape around the sink bowl.

He cut holes inside the bottom two drawers so that the plumbing fixtures could be fitted down through. Then he built center compartments around the holes so that the drawers would be more functional for storing toiletries and bathroom supplies.

This is a view looking down through the top of the dresser after the holes were cut in and the compartments were built. You can see the open spaces in bottom drawers for the plumbing and the curved sides of the top drawers.

We were so excited when we saw how nice the dresser looked with the porcelain sink and nickel fixtures in place.

This photo shows the two top drawers with their new curved sides that surround the sink bowl. The drawers are still fully functional.

This photo shows the piece of oak veneer that was laid under the dresser to cover the floor where the tiles were missing after the vanity was removed. We used flat trim to hide the edges of the board and the tiles. You really don't notice it when you walk into the room. Even when you do see it, it doesn't look bad at all.

In this photo you can see the oak board on the floor and the replaced tiles in the corner. They are shinier than the old tiles, but the color matches almost exactly. Because it's low and in a corner, you never even notice the difference. It just goes to show that things don't always have to be perfect but can still look very nice.

Here are some before and after photos of the make-over.
We replaced the pendant lights and added a wall shelf just above the
vanity. We cut the long wall mirror into smaller pieces and used them
in some wooden frames and medicine cabinet that we made from some scrap
wood and painted with a distressed finish. We love the way it all turned out!
Our bathroom was from the '70's era and since I wanted to renovate it to suit my country decorating style, I got the idea to convert the dresser into a vanity. I wasn't sure how my husband would feel about cutting a hole in the top of his great-aunt's old dresser, but it turned out that he loved the idea! Our thinking was that we could stick the dresser in the basement and use it for storage, or we could put it to use in the bathroom where we could appreciate it every day. So the renovations began.
This is a photo of the old vanity that we removed. Notice that the sink is a 70's blue, but the toilet had been replaced and was more like a 90's periwinkle. It looked purple next to the sink.

When we pulled the old vanity out, we discovered that there was no tile on the floor or the wall where the vanity had been placed. We went to a demolition salvage place, but we couldn't match the tiles. I really liked the ones we had and didn't want to replace them. There's always a solution! We stained a piece of oak veneer to match the dresser and installed it on the floor, and we found some plain ivory wall tiles that matched in color (but not in texture) to the old ones. They are mostly hidden by the new vanity, so we are the only ones who would ever notice the difference.

On to the dresser! I stripped and re-strained again, a repeat from 25 years earlier. My husband cut a hole in the top using the template that came with the bathroom sink we had purchased. Ooh, was that scary!
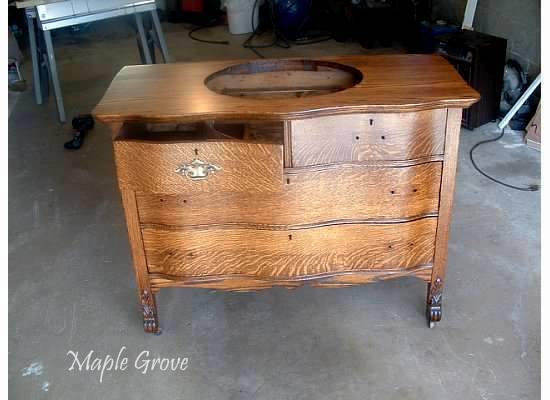
Any time I have seen a dresser converted to a sink vanity, the top drawers are usually eliminated, and the drawer fronts are permanently attached as false drawers. My husband had a very clever idea. He removed the sides of the drawers toward the center and cut the bottoms of the drawer to fit around the oval shape of the sink bowl. He replaced the inner sides with strips of luan that he scored at 1/4" intervals using a table saw so that he could bend it to shape around the sink bowl.


This is a view looking down through the top of the dresser after the holes were cut in and the compartments were built. You can see the open spaces in bottom drawers for the plumbing and the curved sides of the top drawers.

We were so excited when we saw how nice the dresser looked with the porcelain sink and nickel fixtures in place.

This photo shows the two top drawers with their new curved sides that surround the sink bowl. The drawers are still fully functional.

This photo shows the piece of oak veneer that was laid under the dresser to cover the floor where the tiles were missing after the vanity was removed. We used flat trim to hide the edges of the board and the tiles. You really don't notice it when you walk into the room. Even when you do see it, it doesn't look bad at all.

In this photo you can see the oak board on the floor and the replaced tiles in the corner. They are shinier than the old tiles, but the color matches almost exactly. Because it's low and in a corner, you never even notice the difference. It just goes to show that things don't always have to be perfect but can still look very nice.

Here are some before and after photos of the make-over.
 |
| Before - the 70's sink and vanity |
 |
| After - the vintage country look |
Visit Maple Grove on Facebook
Building a Field Stone Sidewalk

They say that if you're in a hurry, a sidewalk ought to be smooth and level. But if you want to slow things down a bit, keep life simple and enjoy the view, a stone walkway can help you accomplish that! Following is the tale of how we built our stone walkway with stones we found on our property.
During an excavation project, we collected the field stones that were uncovered on our property and set them aside, stacking them in piles of small, medium and large sizes until we were ready to build our sidewalk. (While we were waiting for the excavation work to be complete, I had fun building a cairn with some of the stones.)

Our yard was already dug up from the excavation; if it had not been, we would have had to lift up the sod. As it was, we outlined the shape we wanted with rope and laid down landscape fabric to deter grass and weeds from growing.

We filled the area with limestone gravel, raked it, and started laying down the stones. We used larger ones on the edges and scattered in the middle, then filled in between with medium and small stones. It was like putting a puzzle together! (A puzzle without a picture to look at!) The stones could be wiggled down into the gravel to form a more even top surface. After all the pieces were in place, we filled in between the gaps with pea gravel.

When finished, we planted grass seed around it and added some landscaping plants (sun-loving ones for our setting): Blue Fescue, Shasta Daisies, Mums, Asters, and Coral Bells.
A stone sidewalk encourages one to slow down and look around, so add something pretty and interesting to pause and admire . . . like flowers, or chickens!

Building a Paving Stone Sidewalk
If we could do it, you can too! Our front sidewalk is much longer than our back sidewalk, so we decided to use paving stones instead of field stones. The paving stones gave us a smoother, more even surface. We decided to extend it across the front of the porch and wrap it around the side. (Later we removed the porch railing and ended up with a larger porch area.)
First we marked out the shape of the sidewalk with spray paint. We removed the sod, laid down landscaping fabric, a layer of limestone gravel, and then a layer of sand. That all has to be tamped down before you start laying down the paving stones. You can rent a tamper from many hardware stores.

We decided to curve the shape of our sidewalk leading from the porch to the driveway. This design gave it a little more interest than a long straight sidewalk. We used boards to frame the straight part of the sidewalk in front of the porch and landscape edgers for the curved section.

The end result is a sidewalk that encourages you to slow down and take it easy. Some landscape plants and a porch swing are additional encouragement for taking a break and relaxing. That's our goal--to make life simpler and more relaxed.


First we marked out the shape of the sidewalk with spray paint. We removed the sod, laid down landscaping fabric, a layer of limestone gravel, and then a layer of sand. That all has to be tamped down before you start laying down the paving stones. You can rent a tamper from many hardware stores.

We decided to curve the shape of our sidewalk leading from the porch to the driveway. This design gave it a little more interest than a long straight sidewalk. We used boards to frame the straight part of the sidewalk in front of the porch and landscape edgers for the curved section.

The end result is a sidewalk that encourages you to slow down and take it easy. Some landscape plants and a porch swing are additional encouragement for taking a break and relaxing. That's our goal--to make life simpler and more relaxed.


Vintage Hen House Design
When we got our first flock of chickens, we knew virtually nothing about coop designs. We spent a lot of time researching, reading, and gleaning what we thought were the most important features. After designing and building our hen house, we named it "Cluckingham Palace."
I wanted the hen house to have a vintage appearance as if it had been there for years. We intentionally built it right next to an existing tree so that the chickens would have some shade. We laid some landscaping fabric and pea gravel around the house to make it easier to mow the grass around it. We planted climbing rose shrubs under the front and side windows. We're hoping they will do well and eventually grace the hen house with some beautiful blooms.

Our hen house is 6'x8'. A friend of ours who owns an antique store donated the old doors and windows which really add to the vintage look. By hanging the windows with hinges "awning style," we can prop them open even when it's raining.

Good ventilation in the hen house is very important for circulating the air and releasing heat and moisture. Chickens give off moisture from their respiration and droppings. If the coop is not ventilated, this moisture can cause freezing conditions in the winter. The droppings can give off ammonia if the moisture begins to decompose it. Ventilation (usually screened openings) should be placed above roost level on opposite walls of the coop to provide cross-ventilation, allowing moisture to escape and fresh air to replace the old. The more chickens that are in the coop, the more ventilation you need. We placed four ventilation openings (two each on front and back sides) cut into the underneath side of the overhangs and covered with screening material and register covers. This house is not insulated and has no electricity (no heating), but stays comfortable year-round for the chickens because it has good ventilation but no drafty openings. The tree provides shade in the summer, and the four windows (one on each wall) provide some solar heat in the winter.

The perches where they roost at night are on the right side. Under the perches is a "poop pit." Chickens poop a lot when they are sleeping. 99% of their droppings will be under the perches. We surrounded it with 2"x4" welded fencing so they can't walk in it, but the droppings mostly fall through it.. You can see a half-door on the back wall behind the poop pit that is an access for cleaning it.

The rest of the hen house floor stays relatively clean. We use a thick layer of straw on the floor and replace it only twice a year. The perches are hinged to the back wall so we can lift them when we are cleaning out the hen house.

The feeder is sitting on top of a concrete block to raise it to a comfortable height for the chickens. It is secured to the ceiling with a chain. The combination of the chain and the block helps to keep it stable and in place. We drilled a hole in the bottom of a plastic coffee container and slipped the chain through it. Hanging something above the feeder keeps the chickens from jumping up on top of the feeder and pulling it down.
The back of the hen house has a half-door that opens so that we can periodically clean out the poop pit. We just rake it out into a wheel barrow and dump it onto a compost pile. Chicken manure is an excellent fertilizer, but you have to let it sit for a few months before using it or it will burn out your plants.
The poop pit is a wooden frame wrapped in 2"x4" chicken fencing with a loose board laying on the floor. We can slide out the floor and the framed fencing through the access door to give them a thorough cleaning. It is not attached to the perches.

This is the back of the hen house showing the half-door access to the poop pit. On the side of the house there is a hatch opening with a ramp that goes down into the attached outdoor run On the left side of the run you see a swinging gate where we can enter the run when necessary (albeit bent over).
The wooden box in the run has sand in it. The chickens eat this "grit" to help digest their food. They could also use this box of sand for their dust baths, but they prefer to dig a hole in the dirt instead. Chickens love to roll around in the dirt (dust bathe) which actually does clean them by getting rid of excess oils, fleas and mites.

This is a front view of the attached run. It wraps around the tree so they get the benefit of the shade. There is a perch for them in the front of the run. We also dragged a sturdy branch into the run that they love to climb on. We attached a small roof above the hatch opening to keep rain from going inside the house.

The nesting boxes are on the left side of the hen house, along with the water feeder. I made curtains out of old seed bags for the nesting boxes, because they do like their privacy when laying. I placed a golf ball in each nest to train the new flock where to lay their eggs.


I wanted the hen house to have a vintage appearance as if it had been there for years. We intentionally built it right next to an existing tree so that the chickens would have some shade. We laid some landscaping fabric and pea gravel around the house to make it easier to mow the grass around it. We planted climbing rose shrubs under the front and side windows. We're hoping they will do well and eventually grace the hen house with some beautiful blooms.

Our hen house is 6'x8'. A friend of ours who owns an antique store donated the old doors and windows which really add to the vintage look. By hanging the windows with hinges "awning style," we can prop them open even when it's raining.

Good ventilation in the hen house is very important for circulating the air and releasing heat and moisture. Chickens give off moisture from their respiration and droppings. If the coop is not ventilated, this moisture can cause freezing conditions in the winter. The droppings can give off ammonia if the moisture begins to decompose it. Ventilation (usually screened openings) should be placed above roost level on opposite walls of the coop to provide cross-ventilation, allowing moisture to escape and fresh air to replace the old. The more chickens that are in the coop, the more ventilation you need. We placed four ventilation openings (two each on front and back sides) cut into the underneath side of the overhangs and covered with screening material and register covers. This house is not insulated and has no electricity (no heating), but stays comfortable year-round for the chickens because it has good ventilation but no drafty openings. The tree provides shade in the summer, and the four windows (one on each wall) provide some solar heat in the winter.

The perches where they roost at night are on the right side. Under the perches is a "poop pit." Chickens poop a lot when they are sleeping. 99% of their droppings will be under the perches. We surrounded it with 2"x4" welded fencing so they can't walk in it, but the droppings mostly fall through it.. You can see a half-door on the back wall behind the poop pit that is an access for cleaning it.

The rest of the hen house floor stays relatively clean. We use a thick layer of straw on the floor and replace it only twice a year. The perches are hinged to the back wall so we can lift them when we are cleaning out the hen house.
- Update: I can't stress enough how effective the poop pit is for keeping the hen house clean. No one likes to look at poop, but nevertheless, I added this photo taken several months later to show you proof of how the droppings are contained in the poop pit while the rest of the floor is clean. Because the droppings are protected in the pit, they stay dry and there is no foul odor in the house. It's only when the droppings get wet that they release the over-powering smell of ammonia. (Look how much the Chickie-Babes have grown!)

The feeder is sitting on top of a concrete block to raise it to a comfortable height for the chickens. It is secured to the ceiling with a chain. The combination of the chain and the block helps to keep it stable and in place. We drilled a hole in the bottom of a plastic coffee container and slipped the chain through it. Hanging something above the feeder keeps the chickens from jumping up on top of the feeder and pulling it down.
The back of the hen house has a half-door that opens so that we can periodically clean out the poop pit. We just rake it out into a wheel barrow and dump it onto a compost pile. Chicken manure is an excellent fertilizer, but you have to let it sit for a few months before using it or it will burn out your plants.
The poop pit is a wooden frame wrapped in 2"x4" chicken fencing with a loose board laying on the floor. We can slide out the floor and the framed fencing through the access door to give them a thorough cleaning. It is not attached to the perches.

This is the back of the hen house showing the half-door access to the poop pit. On the side of the house there is a hatch opening with a ramp that goes down into the attached outdoor run On the left side of the run you see a swinging gate where we can enter the run when necessary (albeit bent over).
The wooden box in the run has sand in it. The chickens eat this "grit" to help digest their food. They could also use this box of sand for their dust baths, but they prefer to dig a hole in the dirt instead. Chickens love to roll around in the dirt (dust bathe) which actually does clean them by getting rid of excess oils, fleas and mites.

This is a front view of the attached run. It wraps around the tree so they get the benefit of the shade. There is a perch for them in the front of the run. We also dragged a sturdy branch into the run that they love to climb on. We attached a small roof above the hatch opening to keep rain from going inside the house.

The nesting boxes are on the left side of the hen house, along with the water feeder. I made curtains out of old seed bags for the nesting boxes, because they do like their privacy when laying. I placed a golf ball in each nest to train the new flock where to lay their eggs.

This is an inside view of the hatch that leads
out to the run. The hatch has a door that slides up and down and is
attached by a rope to pulleys. I can just reach inside the front door
and grab the rope to open or close the hatch door.

This little backyard flock enjoys their home, and we sure enjoy them! Keeping a backyard flock is not hard once you get everything set up. It
takes commitment to visiting them daily, replenishing their food and
water and gathering the eggs. Because our chickens have regular access to the outdoors as free range chickens, and because of our "poop pit" and deep straw litter system, we
only have to clean out the house every six months. We find the work to
be minimal and the rewards to be huge: namely, fresh nutritional eggs
and a friendly flock that entertains us.

More articles on keeping chickens.
Subscribe to:
Posts (Atom)