Showing posts with label decorating. Show all posts

God Bless America

A Journal During the Coronavirus Pandemic
Reflections and Inspiration from Maple Grove
May 17, 2020

I like to decorate for each season.  Toward the end of May, I switch from spring to summer decor. Because the upcoming months recognize the national holidays--Memorial Day, Flag Day, Independence Day, and Labor Day--it's fitting to display Americana.  We made this American flag art several years ago.  (You'll find a link to how we made it at the end of this post.) The crucifix is very special to us.  When Danny student taught for his degree in Industrial Arts Education, one of his students made it for him.  It has hung in our home since we were married forty-four years ago.

How to Make Simulated Leaded Glass Window Designs

This is a quick tutorial about how I made a simulated leaded glass design on my windows.  The products I used are made by Gallery Glass by Plaid:  Instant Lead Lines, Crystal Clear Window Color, and Simulated Liquid Leading.  The Instant Lead Lines are adhesive rubber strips. It only cost $26 to decorate two windows.

Look Beyond the Challenge

A Journal During the Coronavirus Pandemic
Reflections and Inspiration from Maple Grove
March 22, 2020


The first I recall hearing about an outbreak of a virus was probably in January when headlines carried news of a mysterious respiratory illness spreading from China through Europe. In February, we learned the disease was identified as a coronavirus and was named COVID-19. It had reached the United States and by mid-March had been declared a worldwide pandemic. It quickly spread to all 50 states. A United States National Emergency was declared, and that's when life began changing for all of us.  

The purpose of these posts is not to provide details about COVID-19 nor to offer opinions about political or economic ramifications.  It has been a long time since I got away from "blogging," and I see this as an opportunity to simply share a journal of my personal experiences and reflections about life for us at Maple Grove during this crisis.

The Chrismon™ Tree


What is a Chrismon?™


The word “Chrismon™” is a combination of the words “Christ” and “Monogram” (meaning symbol). Traditionally, Chrismon™ ornaments are not sold; they are homemade. They are always white and gold. . . white symbolizing that Jesus is pure and perfect, and gold symbolizing His majesty and glory.  They can be made from paper, styrofoam, wood, embroidery, needlepoint, beading, or any other material and process. Making Chrismons™ is an excellent project for a church group to share in fellowship while learning about Christian symbols and the life of Christ.


History of the Chrismon™


Chrismons™ are first of all Christian symbols. From the beginning of Christianity, persecuted followers used symbols to communicate secretly with each other. Christian symbols have been used in churches ever since.

Trash to Treasure: Pumpkin Wall Art


I love to decorate for the seasons of the year.  I think the fall decorations are my favorites.  I love pumpkins, and when Thanksgiving is over and it's time to bring out the Christmas decorations, I like to take my pumpkins outside and decorate the back border of our property with them, setting up colorful vignettes that I can see from the windows in my house.  Throughout the remainder of winter, I don't have to wait for spring blooms to make their appearance in order to see bursts of color among the dead leaves or blankets of snow.

I took photos of my pumpkin displays, and all of a sudden the idea hit me to recycle these pumpkins yet again by having a photo of one of my own pumpkin displays enlarged for framing.  How exciting!  I love it when an idea like that strikes me! The real fun was searching for the perfect "trash to treasures" frame.

In the end, these recycled pumpkins served as decorations for our home for a third time. First, the fresh-picked pumpkins decorated the inside of our home in the fall. Then they decorated the outdoors behind our house throughout the winter months.  Finally, they re-entered our home as an image captured and a memory that lingers.  If you're interested in the step-by-step how-to's, read on.

Hanging Mason Jar Candleholders and Dangling Bead Strands

It started out as a summer project, but it was the winter that surprised and gripped me!  Mason jar candleholders and shiny beads to hang in our beloved Maple tree!  Summer evenings bring grilling outdoors and sitting around the fire ring.  How lovely it is to linger under the canopy of maple leaves and see the candles glowing in the jars and the strings of beads dangling in the breeze.

Rustic Winter Mantel Display


A home can look so bare and empty after the Christmas decorations are taken down and packed away.  Usually I automatically leap to the typical, expected Valentine's decorations.This year I felt like I needed a change, but what?  Rather than go out and buy new decorations, I decided to rummage around the house and see what I have that I could use to decorate the fireplace mantel for the remainder of the winter.   

Chicken Feeder Candy Dish


What a cute and inexpensive candy dish in time for spring and Easter!  Buy and wash a galvanized chick feeder from your local Tractor Supply or farm feed store.  Fill a mason jar with candy and attach it to the feeder.  What could be more simple?

How to Build a Support Structure for a Farm House Sink


In planning for the renovation of our kitchen, we knew that we wanted  a country style. One of the icons of a country kitchen is the farm sink.  These sinks and the necessary hard surface counter to go with them can be costly, so we tried to reduce costs in every other way we could by doing the work ourselves, waiting for a sale on cabinets, and buying lower-end appliances.  The sink and counter top were our splurge. There are many different types of farm house sinks, made of a variety of materials.  We chose a single basin apron front sink made of fireclay.

Christmas Decorating Series - Part 1: Lights


It's that time of year again!  Time to deck the halls!  So I climbed up into the attic to retrieve my boxes of Christmas decorations. There they are . . . right where I left them last year (I think). Well, I better get busy, because there aren't any elves who are going to come and do it while I'm sleeping (are there?). 

I've had a lot of experience decorating Christmas trees.  For one thing, I've been around for quite a while, and for another thing, I've been decorating a dozen or more trees in my home for many years.  Yes, I tend to go overboard, but I can't help it; I have a Christmas tree fetish.  Each tree has a theme and a name. I thought I'd write a series of posts about my Christmas trees, sharing a few tips I picked up along the way and giving a tour of them.  This is Part 1 in the series- The Lights!

How to Make Tea Cup Candles


What a beautiful combination--delicate china tea cups and warm glowing candles.  You can easily turn tea cups into candle holders to grace your table for a Ladies Tea. The possibilities:  set a votive candle inside a cup; turn a cup over on the saucer and set a votive candle on top of the cup; set a small candle holder with a taper candle inside a cup; or fill a cup with melted wax and a wick.

❇ Snowmen in a Jar ❆


If you're the type of person who goes around singing "Let it snow, let it snow, let it snow" all winter, now you can preserve your snowmen until the spring thaw.  And even if you don't like snow, you can't help but love these snowmen in a jar for winter decorating. In keeping with the "Canning Jar Week" on Farm Chick Chit Chat this week, I offer this decorating idea.  After all, like it or not, winter is just around the corner.

Choosing a Color Scheme


Do you have a hard time choosing colors?  It seems to be a topic that comes up often in my circle of friends and acquaintances.  I think we have all struggled with color choices at one time or another.  When choosing the colors for our shed, I stepped back and looked at its surroundings.  I wanted the shed to blend in rather than stand out, so I chose shades of green that matched the leaves of the wild cherry trees and the branches of the blue spruce evergreens that neighbor it.

For the door, I used a shade called "Sumac Red."  It perfectly matches the fall leaves of the Sumac trees that are visible above the roof.  In the summer also, the door coordinates with the blooming seed pods on the Sumac trees.  In addition to harmonizing with nature, this color scheme works because green and red are opposite (or complementary) colors on the color wheel.

Canning Lids Pumpkin

 I've seen photos of the Canning Lids Pumpkin floating around on Pinterest, Blog pages and Facebook. I thought, "Hey, I've got a bag of rusted canning lid rings ... I can make that." So I did!

I used 32 rings for this "pumpkin." I strung wire through the rings and twisted it tight, put some Spanish moss down in the cavity, wrapped a rubber band around some cinnamon sticks for the "stem," and pl
aced some fall potpourri around the top. I'm so glad I kept those damaged lid rings!

 I love sharing ideas back and forth online; I think it's appropriate to give credit where credit is due. As far as I could determine, this idea originated at Simply Klassic Home.


Talking Chicken


Not so many years ago, it was very common for people to keep chickens in their yards. Most people had them.  My grandparents did, and since I got chickens, my Dad loves to tell me chicken stories from his youth. I think most homes back then had chickens, and all of the men and women knew how to raise and feed them, gather the eggs, slaughter and clean the fowl.  During the World Wars, there was propaganda encouraging people to tend chickens for the war efforts.

An Immigrant's Trunk

This is an immigrant's trunk from the 1800's.  Rare and unique. When you look at it, what do you see?  Old? Worn? Ugly? That's what it looked like to me when I was a little girl.  It sat in my Mom's basement and stored our family's camping tent.  Years later, after I was married, my Mom said she wanted to get rid of it.  At the time, I did not have the appreciation for antiques that I do now.  Rustic and primitive had not yet made its way into my heart.  But when she told me that it belonged to my great-great-grandfather and that it made the journey with him from Germany when he immigrated to the United States, I could not let it get away from the family.  I said I would take it.


It sat in my basement for a number of years but eventually found a special place in my heart and at the foot of my bed.  I sit on it every day to put on my socks and shoes.  Every day I think about the man who left the country of his birth and brought his family to the land of opportunity, the land of freedom, and land where every person is entitled to life, liberty and the pursuit of happiness.   

Thank you, great-great-grandfather. Your trunk may be old, but it is not ugly.  It is beautiful. It is a reminder to me every day of how grateful I am to you and how blessed I am by God to be an American.  It is also amazing that your trunk has been passed down for over 100 years through five generations. It may be worn, but it still has its original paint.  I can faintly see your name stenciled on the front.  Jakob Ritter.


My great-great-grandfather Jakob had a son named Jacob, who also had a son name Jacob (my grandfather's brother).  Two months ago my daughter had a baby boy--my grandson. He's brand new. He's an American, seventh generation. His name is Jacob.

I love doing laundry now!

This post is for anyone who loves chickens ... or antiques ... or nice views.  If you appreciate any of those, then you'll probably appreciate this.  I hope it gives you some ideas.

We lived for 29 years in a multi-level home.  And I do mean multi!  It was a split-ranch, but we had finished the basement into a family room and then raised the roof and added two bedrooms and a bath above the main living area (with the original three bedrooms and a bath on the split level in between).  We referred to the top floor as the mountain top.  It was great for our large family, but when we moved six years ago and became empty nesters, our goal was one-floor living.  We bought a one-story ranch, and to make that dream a reality, we added on a laundry room/sun room next to the kitchen. 

I had been hanging onto some antiques for years with this vision in mind.  The enamel top table and cabinet belonged to my great-aunt.  They were rusting out, but we rubbed them with steel wool and sprayed them with appliance paint, and they look like new.  Because this new space is next to the kitchen, I gained an extra sink and counter space for food preparation and clean-up when we have the whole family at our house for holidays.


 On top of the wall cabinets are some of my treasures.  The wash board and basin on the right belonged to my grandmother. And here's where the chicken lovers come in: my girlfriend gave me the antique chicken crate that was from her aunt's farm. This made it easy to tie a chicken theme into this room.


I love doing laundry now!  It is hard to dislike folding clothes when you're in a room with some of your favorite things and have a grand view of the outdoors!


And now for the final salute to chickens. My uncle was an artist and painted this painting of chickens many, many years ago.  I held onto it for a long time, way before I even had chickens.  It fits right in!


It's hard to tell which I like the most -- the room, the antiques, the chickens, or the view.  I feel so blessed and thankful to God for giving us all of this!

Visit Maple Grove on Facebook and Pinterest

Antique Dresser turned Vanity

When my husband was a child, he kept his clothes in an old dresser that belonged to his great-aunt.  It had taken a beating, so when we got married and had children of our own, I stripped and re-stained it for my daughter to use in her bedroom.  It took another beating.  Years went by, and my daughter was married, but I hung onto the antique dresser.  I wasn't sure how or where I would use it, but I love antiques, and I really love turning trash into treasure.

Our bathroom was from the '70's era and since I wanted to renovate it to suit my country decorating style, I got the idea to convert the dresser into a vanity. I wasn't sure how my husband would feel about cutting a hole in the top of his great-aunt's old dresser, but it turned out that he loved the idea!  Our thinking was that we could stick the dresser in the basement and use it for storage, or we could put it to use in the bathroom where we could appreciate it every day. So the renovations began.

This is a photo of the old vanity that we removed.  Notice that the sink is a 70's blue, but the toilet had been replaced and was more like a 90's periwinkle.  It looked purple next to the sink.


When we pulled the old vanity out, we discovered that there was no tile on the floor or the wall where the vanity had been placed.  We went to a demolition salvage place, but we couldn't match the tiles.  I really liked the ones we had and didn't want to replace them.  There's always a solution!  We stained a piece of oak veneer to match the dresser and installed it on the floor, and we found some plain ivory wall tiles that matched in color (but not in texture) to the old ones.  They are mostly hidden by the new vanity, so we are the only ones who would ever notice the difference.


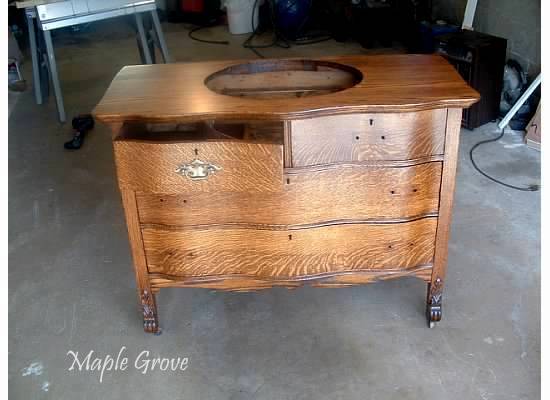
On to the dresser! I stripped and re-strained again, a repeat from 25 years earlier.  My husband cut a hole in the top using the template that came with the bathroom sink we had purchased. Ooh, was that scary!


Any time I have seen a dresser converted to a sink vanity, the top drawers are usually eliminated, and the drawer fronts are permanently attached as false drawers.  My husband had a very clever idea.  He removed the sides of the drawers toward the center and cut the bottoms of the drawer to fit around the oval shape of the sink bowl. He replaced the inner sides with strips of luan that he scored at 1/4" intervals using a table saw so that he could bend it to shape around the sink bowl.


He cut holes inside the bottom two drawers so that the plumbing fixtures could be fitted down through. Then he built center compartments around the holes so that the drawers would be more functional for storing toiletries and bathroom supplies.


This is a view looking down through the top of the dresser after the holes were cut in and the compartments were built. You can see the open spaces in bottom drawers for the plumbing and the curved sides of the top drawers.


We were so excited when we saw how nice the dresser looked with the porcelain sink and nickel fixtures in place.


This photo shows the two top drawers with their new curved sides that surround the sink bowl.  The drawers are still fully functional.


This photo shows the piece of oak veneer that was laid under the dresser to cover the floor where the tiles were missing after the vanity was removed.  We used flat trim to hide the edges of the board and the tiles. You really don't notice it when you walk into the room.  Even when you do see it, it doesn't look bad at all.


In this photo you can see the oak board on the floor and the replaced tiles in the corner.  They are shinier than the old tiles, but the color matches almost exactly.  Because it's low and in a corner, you never even notice the difference.  It just goes to show that things don't always have to be perfect but can still look very nice.


Here are some before and after photos of the make-over.

Before - the 70's sink and vanity
We replaced the pendant lights and added a wall shelf just above the vanity.  We cut the long wall mirror into smaller pieces and used them in some wooden frames and medicine cabinet that we made from some scrap wood and painted with a distressed finish. We love the way it all turned out!

After - the vintage country look


Visit Maple Grove on Facebook